, dev
NVIDIA’s Warp for Houdini
I’ve only found out about NVIDIA’s Warp recently and I really like how it makes writing performant CUDA kernels accessible to Python developers, without anything being in the way to getting started quickly.
After having spent the past 3 years at work developing HDAs, tools, and workflows for Houdini, the first thing that popped into my mind was to check whether a marriage between both apps would be possible. I thought it’d be neat to expose Warp to Houdini users, through the SOP context.
It turns out that it was quite simple to get a Warp kernel updating some point positions but that wasn’t quite enough to be satisfying.
Indeed, that solution was all fairly hard-coded to my specific test case so the next itch was to figure out whether I could build an HDA that would allow reading and writing from/to any geometry attribute.
Additionally, I wanted to take this exercise as an opportunity to share how I personally like to author HDAs in Houdini. But I’ll leave this for another blog post, coming up shortly!
The (Lack Of) Process
Long story short, it was all fairly straightforward to put in place a working solution.
One trick was to use a Solver SOP node to support simulations and the caching of frames, so that we can scrub through the timeline without needing to recompute everything.
As for the rest, it was mostly a matter of converting the data back and forth between both APIs, while... uh... not making silly mistakes that would cause the node to segfault when the input topology would change? Ahem.
The HDA’s interface is somewhat similar to an Attrib Wrangle SOP node mixed with a Solver SOP, with an additional set of parameters allowing to define the inputs and outputs attributes that are to be passed to the kernel.
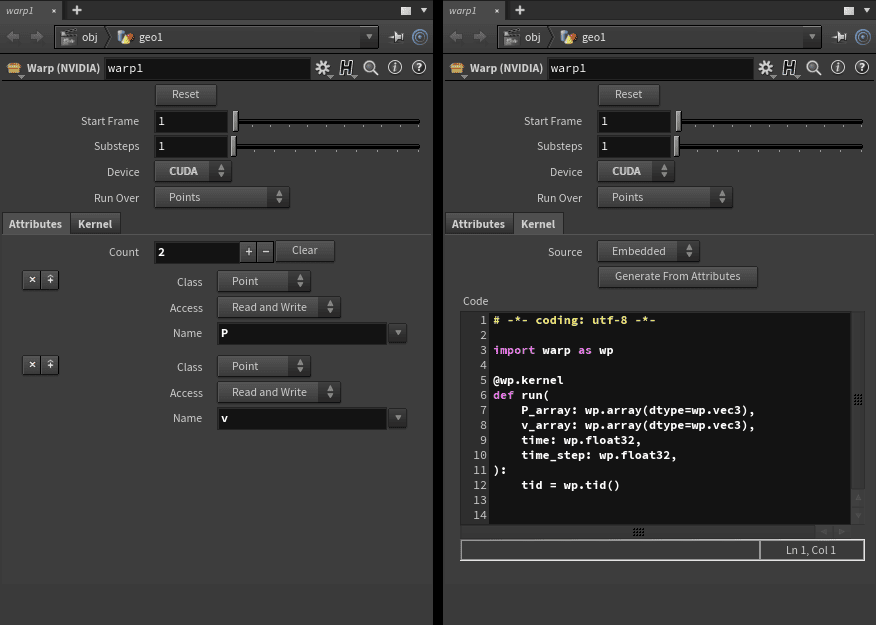
There is also a button that allows generating the code of the kernel function, based on the parameter values from the attributes tab.
To validate the HDA and help documenting its usage, I worked on a couple of examples which aim at keeping things as simple as possible to allow users diving in and understanding what’s required to get started, instead of trying to generate quality results. So if these results look cheap and imperfect (they do!), you can blame me, not the tools.
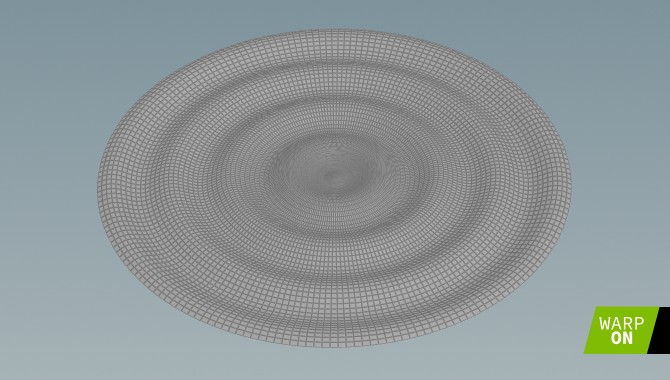
Example: Ripple Deformer
The first example that I built for my tests was a simple ripple deformer. In itself, it bypasses the simulation mechanism since it builds upon the same initial point positions stored into the rest attribute, instead of reading the point positions from the previous step.
The objective here was to make sure that it was possible to change parameter values while the solver is running, even when it involves retopologizing the input mesh.
look ma, I can even change its topology and scrub through the timeline!
# -*- coding: utf-8 -*-

import warp as wp

@wp.kernel
def run(
    P_array: wp.array(dtype=wp.vec3),
    count_array: wp.array(dtype=wp.int32),
    amplitude_array: wp.array(dtype=wp.float32),
    frequency_array: wp.array(dtype=wp.float32),
    rest_array: wp.array(dtype=wp.vec3),
    time: wp.float32,
    time_step: wp.float32,
):
    tid = wp.tid()

    # Detail attributes.
    count = count_array[0]
    amplitude = amplitude_array[0]
    frequency = frequency_array[0]

    # Point attributes.
    P = P_array[tid]
    rest = rest_array[tid]

    # Compute the ripple deformation.
    d = wp.length(P)
    h = sin(-d * frequency + time) * amplitude
    P = wp.vec3(rest[0], rest[1] + h, rest[2])

    # Write out the point attributes.
    P_array[tid] = P

    # Keep track of how many kernels have been run.
    count_array[0] = count + 1
Example: Bouncing Ball
This time, I wanted to try out a real simulation. Something that builds up upon the values computed in the previous step. So, uh... a bouncing ball, anyone?
# -*- coding: utf-8 -*-

import warp as wp

@wp.kernel
def run(
    P_array: wp.array(dtype=wp.vec3),
    v_array: wp.array(dtype=wp.vec3),
    pscale_array: wp.array(dtype=wp.float32),
    bounce_array: wp.array(dtype=wp.float32),
    drag_array: wp.array(dtype=wp.float32),
    time: wp.float32,
    time_step: wp.float32,
):
    tid = wp.tid()

    # Point attributes.
    P = P_array[tid]
    v = v_array[tid]
    pscale = pscale_array[tid]
    bounce = bounce_array[tid]
    drag = drag_array[tid]

    radius = pscale * 0.5

    # Apply the drag force.
    v = v * (1.0 - drag * time_step)

    # Bounce the particle if it went under the ground.
    if P[1] < radius:
        P = wp.vec3(P[0], radius, P[2])
        v = wp.vec3(v[0], -v[1] * bounce, v[2])

    # Apply the gravitational force.
    v = v + wp.vec3(0.0, -9.81 * time_step, 0.0)

    # Solve the position.
    P = P + v * time_step

    # Write out the point attributes.
    P_array[tid] = P
    v_array[tid] = v
Closing Notes
This HDA is quite experimental and has not been thoroughly tested, so use at your own risk!
Oh, and it’s Python 3 only, so you might need at least Houdini 19.
If you scrolled all the way down just to find where to get the HDA, here is the link on GitHub!